Some things are best seen from a distance. Erupting volcanoes, for example, or waterspouts. Or flying canoes, come to think of it. There’s nothing like watching 55 pounds poly plastic kayak headed for your windshield at 65 mile an hour to concentrate the mind.
This was almost caused by me on the way to a river trip once. The canoe came lose on the Popular Street Bridge.I am a pretty good rope mechanic but I liked to use odds and ends of rope to tie my boat onto his car. The day my canoe almost made its maiden flight, I’d been in a hurry. I didn’t check my ropes. Half an hour after leaving home, my bow tie-down let go, and the belly ties were really straining and ready to popped off.
That is still the longest scariest paddling experience I’ve had. I was only 1/3 of the way across the bridge and had to hold on to the canoe with one hand while driving on a 8 lane bridge.
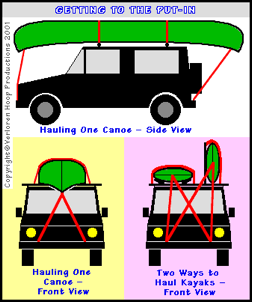
Fortunately, though, it’s easy to tie a canoe or kayak down so it will stay put in a hurricane—or on the Interstate. It’s like mooring a big boat at a crowded berth. You need to run lines to both bow and stern, and you need a couple of additional lines in the middle. These are called mooring “springs” on big boats, but we’ll call them side ties here.
If you want a bomb-proof lashing job—and you do!—you’ll need two of almost everything. Two independent bow anchor-points. Two independent stern anchor-points. And two side ties. The side ties should be tied as close to the boat as possible on the cross bar. There’s one exception to the Rule of Two. If you’re hauling two boats, you can get by with one tie-down line at both bow and stern. Be sure to tie a non-slip loop in the line at each grab-loop (or deck eye) on each boat, however. If you use climber’s carabiners to make connections, figure-of-eight loops works well, and both boats will remain securely tied even if one sect

ion of line is cut.
Whatever you do, don’t make my mistake. Odds and ends of old clothesline aren’t good enough here. Use at least ¼-inch (6-mm) nylon or polyester (Dacron) line. Some folks prefer webbing for belly ties. It’s kinder to plastic boats and fine finishes. And be sure to pad any places where tie-down lines pass over rough surfaces or edges, too. (An edge doesn’t have to be very sharp to chafe through a rope. It only has to be an edge.) Work your way around your boat, tightening every line until it’s just snug. Then do it again, making everything taut.
Just how tight is “taut”? Here’s one test. You’ve got your tie-downs tight enough if you can grab the bow or stern of your canoe or kayak and rock your car without shifting your boat in its cradles. Don’t overdo it, though. You don’t want things so tight that you leave grooves in your boat (or your car roof).
And how should you tighten your tie-downs? I use a trucker’s hitch, but you’ll find lots of gadgets in the catalogs that do the same thing. Just be sure you understand how the gadgets that you use work. Practice tying one on before you leave the driveway!
You’re not done yet. After you’ve been driving for ten minutes or so, get out and check that everything is still secure. Retighten as needed. Check again every couple of hours you’re on the road. And if you ever hear anything that sounds like a Ping! or a Pop! or a Bang!, brake gently and pull off onto the shoulder immediately. Then find out where the trouble is and fix it. (Always carry extra rope.) Whatever you do, don’t just cross your fingers and hope for the best. Your boat may be airborne before you know it, and once that happens, it’s too late for anything but prayer.
It sounds like lot of trouble, doesn’t it? It is. But it’s worth it. After all, I might be driving right behind you on the Interstate! ‘Nuff said.
